Receiving Faxes
To
configure Windows Fax and Scan to receive a fax automatically, select
Tools, Fax Settings, and make sure that the option Allow the Device to
Receive Fax Calls is enabled and the Automatically Answer After radio button is selected. Specify
the number of rings to wait before answering. The computer will now
answer any incoming call on the telephone line connected to its modem,
just like a standard fax machine.
Note
You
can later review, print, or resend any fax you’ve sent or received. To
resend a fax, right-click it in the upper-right pane and select Forward
as Fax. |
If you configure Windows
Fax and Scan to receive a fax automatically, incoming faxes are received
and saved to the Inbox automatically. If you configure Windows Fax and
Scan to receive faxes manually,
a notification appears when an incoming call is detected. If the
incoming call is from a fax device, click the notification balloon to
have the modem pick up and receive the fax.
During the reception,
the Review Fax Status window displays the status of the incoming fax.
Click Close to close the window after receiving the fax.
Printing Received Faxes Automatically
To print received faxes
automatically, click Tools, Fax Settings. On the General tab, click More
Options. In the When a Fax Is Received section, open the Print a Copy
To pull-down menu and select a printer. When you receive a fax, the fax
will automatically be printed on the specified printer.
Scanning Documents with Windows Fax and Scan
To start Windows Fax and
Scan, click Start, All Programs, Windows Fax and Scan. When you open
Windows Fax and Scan, the program opens to the Fax dialog box. Click the Scan button in the bottom of the left pane to switch to the Scan view.
You can change the
scanner’s settings for any individual photo or document, but it helps to
predefine the settings you use most frequently as the defaults. So,
before you scan your first documents, take
a moment to configure the program’s scan settings. Click Tools, Scan
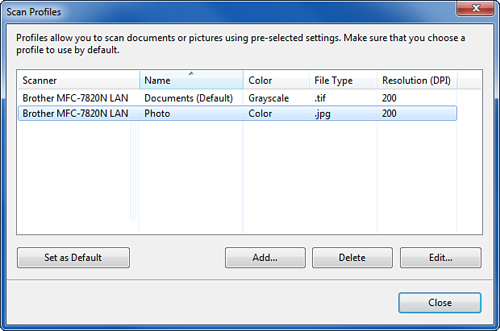
Settings. The default settings, known as scan profiles, for a typical
scanner are shown in Figure 1.
Editing Scan Profile Defaults
The Photo setting is the default scan profile (refer to Figure 1).
If you plan to scan documents more often than photos, click the
Documents profile name (second column), and then click the Set as
Default button to make it the default profile. This will set this
profile as the one to use with your scanner’s “one-button scanning”
feature, if it has one.
To edit the default scan resolution or other settings for a profile, select the profile, and then click Edit. Figure 2 illustrates the settings for the Documents profile.
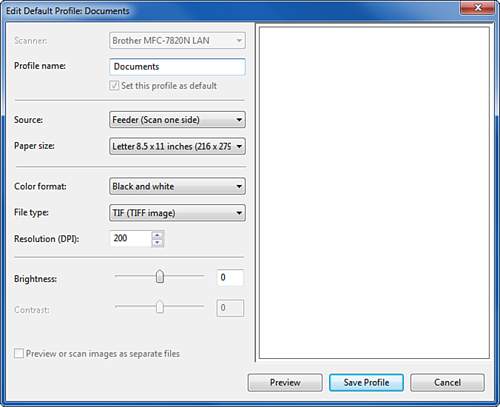
From this dialog box, you
can select the scanner (if you have more than one installed), the
profile name, the paper source (such as flatbed or automatic document
feeder [ADF]), the paper size, the color format (black and white,
grayscale, or color), the file type (JPEG, BMP, TIFF, or PNG), and the
scan resolution, brightness, and color. Make the changes you want to the
profile and click Save Profile to replace the current settings with
your changes.
|
What
resolution should you use? 300dpi matches the Very Fine (best quality)
black-and-white document resolution setting supported by most recent fax
machines. However, for most faxing applications, 200dpi is adequate.
Use a higher resolution, such as 600dpi, if you are scanning a photo for
printing on a high-quality color inkjet or laser printer or for
publishing use. See the printer documentation or the publisher’s
requirements for the recommended dpi. For images that you plan to email
or use on a web page, try 75 to 96dpi. This will produce a smaller image
that is better suited for displaying on a computer screen.
For color photographs,
set the Color Format to Color. For black-and-white pictures or faded
documents, set the Color Format to Grayscale. For most typed documents
and for pencil or pen-and-ink line drawings, select Black and White.
Under File Type, for
color or grayscale scans, the TIFF format produces the best quality but
is rather large. If you want to save disk space, use JPEG or PNG. BMP
can be used by applications that do not support other file types, but
BMP files are also large. For black-and-white scans, use the TIFF
format. JPEG is not a good choice—it can cause blurriness and weird image distortions in black-and-white scans.
|
Creating a New Scan Profile
You
can create a new profile to give yourself an additional set of default
settings to choose from. To create a new scan profile, click Add in the
Scan Profiles dialog, box shown in Figure 1.
The Add New Profile dialog box appears. Enter the profile name, select
the paper source, and make other changes as needed. Click Save Profile
to save the new scan profile.
Tip
The
preset resolution for a new scan profile is 200dpi. To match the dpi of
current Windows desktops, we recommend 96dpi for viewing or emailing.
Use a resolution of at least 200dpi or more for profiles intended for
printing or faxing. See the sidebar “Choosing the Right Settings” for specific resolution recommendations for different types of documents and destinations. |
Scanning Images
Windows Fax and Scan is
best used to scan documents (text and black-and-white drawings), but you
can use it to scan pictures. To scan a photo with Windows Fax and Scan,
insert the photo into your scanner. If the scanner is a flatbed design,
insert the photo face down (photo against the cover glass). If the
scanner includes a feeder (ADF) or uses a sheet-fed design, see the
documentation or markings on the scanner to determine whether photos are
inserted face up or face down.
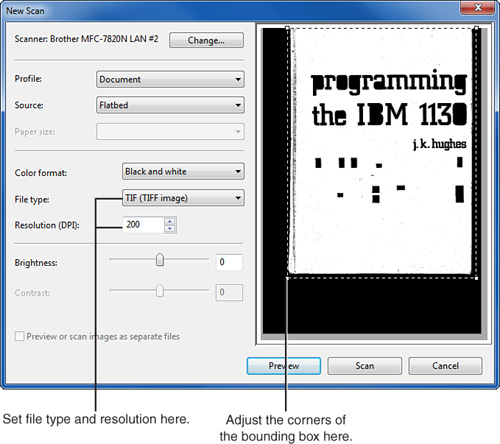
Click New Scan. If you
have more than one scanner installed, select a scanner. Select the
profile desired, and click Preview to see a preview scan. If you wish,
click and drag the bounding boxes to the edges of the photo, or crop the
photo as desired. If the photo is too bright or too dark, adjust the
Brightness slider. Adjust the Contrast slider if the photo is too flat
(contrast too low) or too harsh (contrast too high). To see the results
of the changes, click Preview again. When you are satisfied with scan
quality, click Scan (see Figure 3).
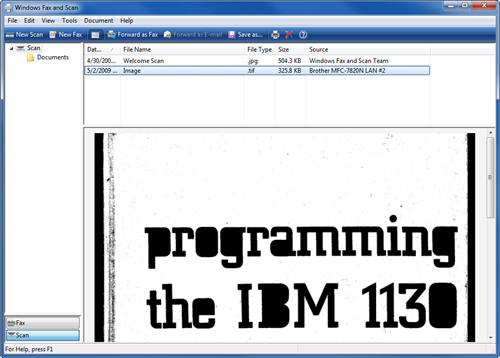
A scanning progress bar appears, and the scanned image is displayed in the workspace after being saved to disk, as shown in Figure 4.
Tip
Fax
and Scan doesn’t let you drag and drop files, which is sort of
annoying. It’s sometimes easier to work with scanned files using Windows
Explorer. You’ll find the files under My Documents, inside the Scanned
Documents folder. |
You can select items in
the Fax and Scan workspace list and right-click to choose various
actions such as View, Print, Send To (for faxing), Rename, and Move to
Folder.
If
a USB 2.0-based scanner is very slow, make sure you have connected the
scanner to a USB 2.0 (also known as Hi-Speed USB) port. Some
front-mounted USB ports support only USB 1.1 speeds. If you have
connected the scanner to an external USB hub, try connecting the scanner
directly to a USB port on the computer. |
|
Emailing Scans
If
you have a standalone email program (such as Outlook) installed, it’s
easy to email a scanned document or photo. Just open the Documents
folder in Scan view. Select the item you want to email, and click
Document, Forward as Email. Enter the recipient(s), message, and other
information, and click Send to send the scan.
If you use a web-based
email service, you’ll have to compose an email and use your email
system’s Add Attachment feature to upload the image files. You can find
them under My Documents inside the folder Scanned Documents.
Faxing Scans
To fax a scanned document
or photo without switching to the Fax view, select the item you want to
fax and click Document, Forward as Fax. The New Fax dialog box appears.
Enter the fax number and other information and click Send to fax the
scan. If you want to fax more than one scanned image (or set of images),
in the Fax window, click Insert, File Attachment, and locate the
additional image(s). You’ll find them under My Documents inside the
folder Scanned Documents.
Manipulating Scanned Images
On a clean install of
Windows 7, scanned images are edited by Windows Photo Gallery by
default. To edit a scanned image, click Start, Documents, Scanned
Documents. Right-click the image and select Edit to open it with the
default photo editor. To choose a different photo editor, select the
image you want to edit, and right-click Open With. Choose your preferred
image editor from the context menu, or click Choose Default Program to
select a different program from those listed.
Note
If
you edit the image with a program that supports other image file
formats, such as Adobe Photoshop or Adobe Photoshop Elements, make sure
you save the edited image as a JPEG, TIFF, BMP, or PNG file if you want
to be able to use it in Windows Fax and Scan. |